Introduction to Intune Network Drive Automation
Let’s face it managing network drives isn’t exactly the highlight of anyone’s day. But when a client came to me drowning in over 20 network shares , I knew we needed a smarter solution. Adding a network drive to an endpoint? Sure, it’s not rocket science. You import the custom ADMX and ADML files, set up a policy, and voilà—the drives appear. Easy enough.
But here’s where things get messy: those friendly display names that make life easier for users. Normally, I’d roll up my sleeves and craft a separate script for each share. But maintaining 20+ scripts? No, thank you! I didn’t sign up to be a full-time script wrangler.
So, I decided to channel my inner Dumbledore and create one script to rule them all—a handy remediation script that sets all the display names correctly in one go. Now, instead of juggling a small army of scripts, we have a sleek, efficient solution that’s easy to maintain.
Before we dive into the main event, if you’re looking for a deep dive into adding network drives via Intune policies, I highly recommend checking out Rudy Ooms excellent blog post. He covers the ins and outs of the process in great detail.
In this post, I’ll give you a quick refresher on setting up network drives using Intune policies. Then, we’ll unravel the magic behind the remediation script. I’ll walk you through how it works, why it’s a game-changer, and what tweaks you’ll need to make it sing for your organization.
So grab your favorite beverage, settle in, and let’s turn network drive management from a headache into a breeze. Trust me, your future self (and your users) will thank you!
Deploying Network Drives with Intune
Prepare Your Custom ADMX and ADML Files
First, make sure you have your custom ADMX and ADML files ready. These files contain the policy definitions and language-specific resources needed for your custom policies.
Access the Microsoft Endpoint Manager Admin Center
- Sign in to the Microsoft Endpoint Manager admin center using your administrator credentials.
Navigate to the Import ADMX Option
- In the left-hand navigation pane, select Devices.
- Under Policy, click on Configuration profiles.
- At the top of the Configuration profiles pane, click on Import ADMX.

Upload the ADMX & ADML File
- In the Import ADMX pane, click on Select file under ADMX file.
- Browse and select your custom .admx file from your local machine.
- Click Open to upload the file.
- In the Add language file pane:
- Select file: Click and browse to your corresponding .adml file.
- Click Add to upload the language file.
- After uploading, review the details to ensure everything is correct.
- Click Next.

Review and Import
- On the Review + create page, review the settings.
- Click Create to finalize the process.

Confirm the Import
- confirm that the custom ADMX file and associated ADML files have been imported successfully.
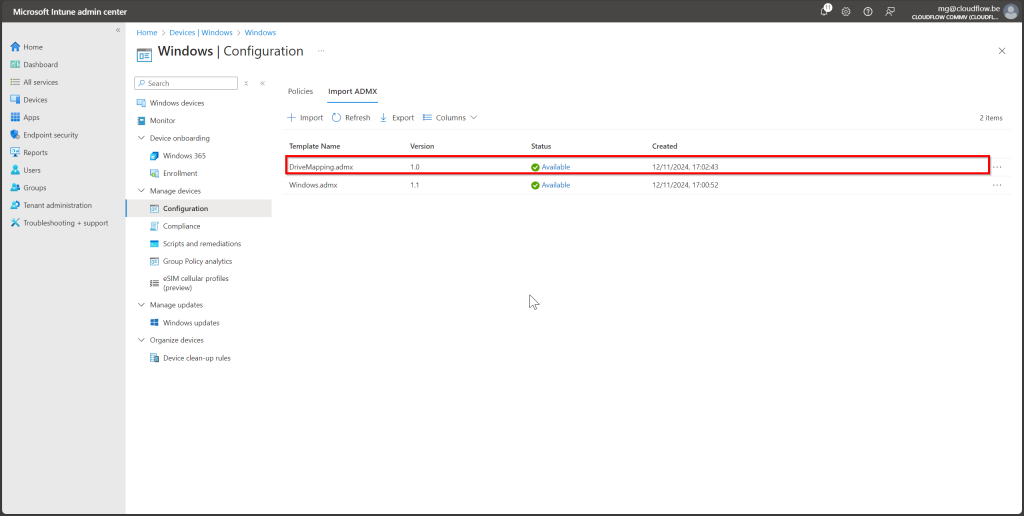
If you have the following Error please Read the following article on how to fix this issue. -> ADMX Upload Error: ADMX File Referenced not Found | Intune

Create a Configuration Profile Using the Imported ADMX
Now that your custom ADMX files are imported, you can create a configuration profile to deploy the settings.
- Go back to Configuration profiles and click + Create profile.
- Select:
- Platform: Windows 10 and later.
- Profile type: Templates.
- Choose Impoted Administrative Templates from the list.
- Click Create.

Name and Describe Your Profile
- Name: Enter a name like “Network Drive Mapping Policy”.
- Description: Optionally, add a description.
- Click Next.
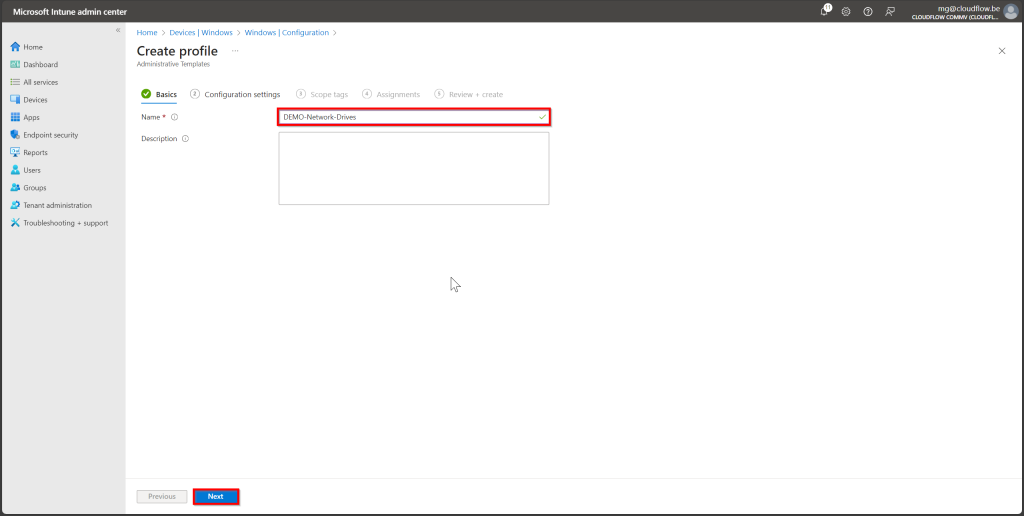
Configure the Settings
- In the Settings section, you’ll now see your custom policies under Administrative Templates.
- Navigate to your custom policy settings, which should appear based on the categories defined in your ADMX file.
- Configure the network drive mappings according to your requirements:
- Drive Letter: Specify the drive letter to assign.
- Network Path: Enter the UNC path (e.g.,
\\ServerName\ShareName).
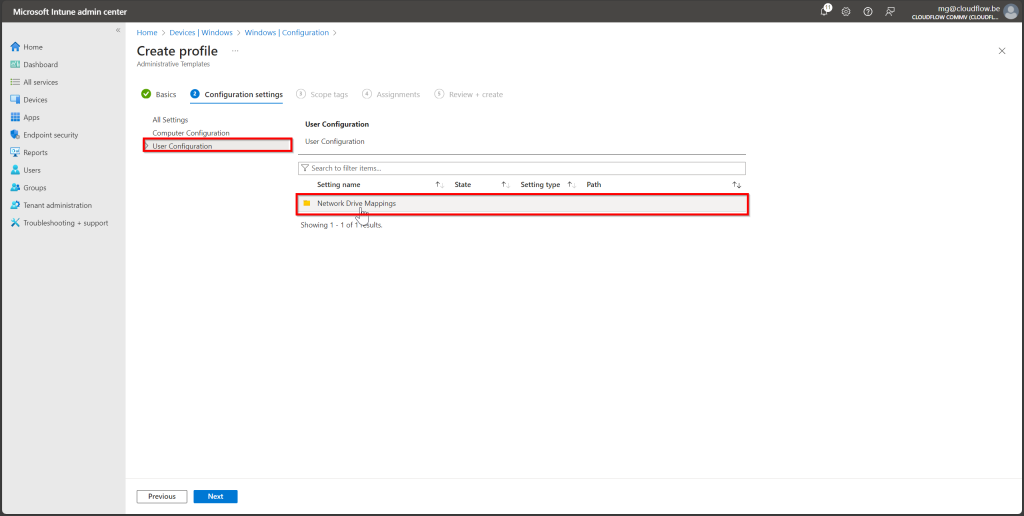
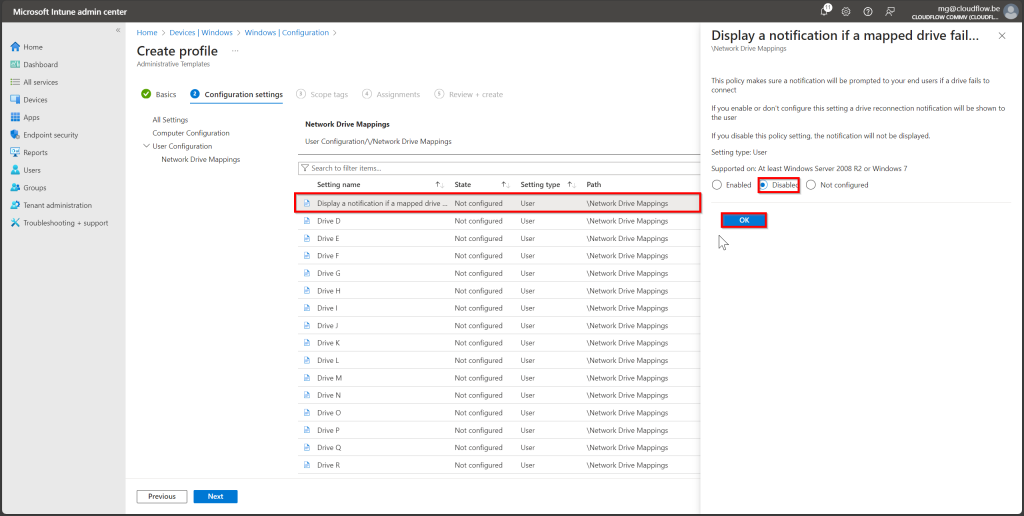

Assign the Profile
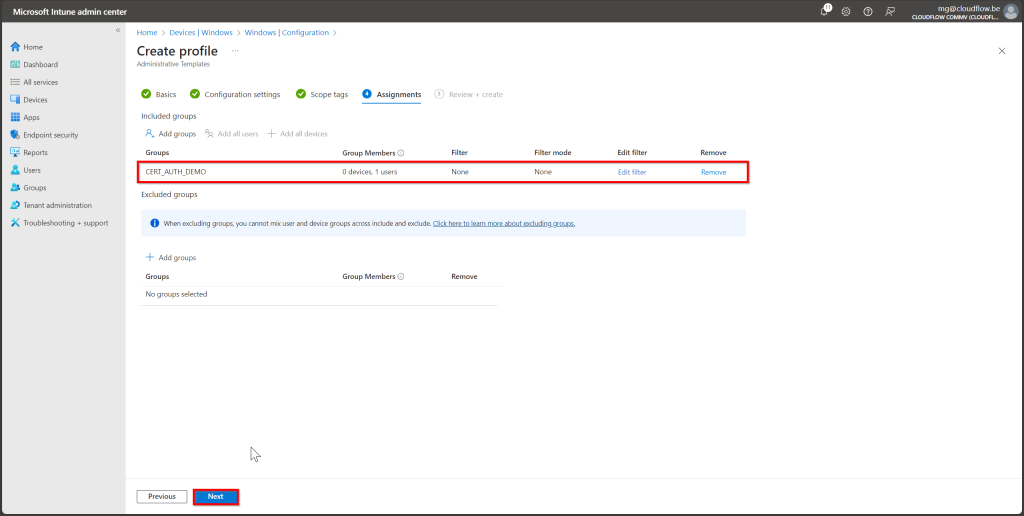
- Click Next to proceed to the Assignments tab.
- Assign the profile to the user or device groups that require the network drive mappings.
- Click Next.
Review and Create
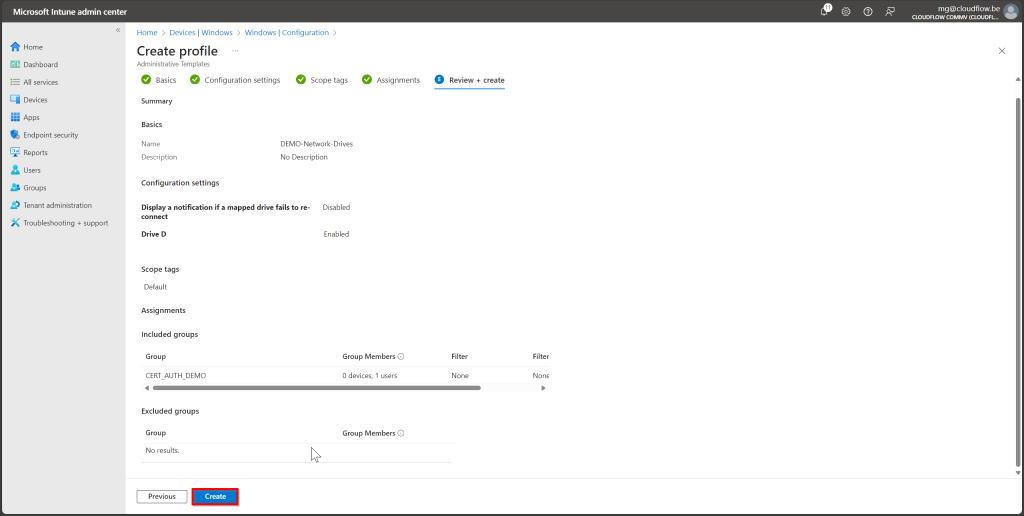
- Review your configuration settings to ensure accuracy.
- Click Create to deploy the policy.
Verify the Policy Deployment
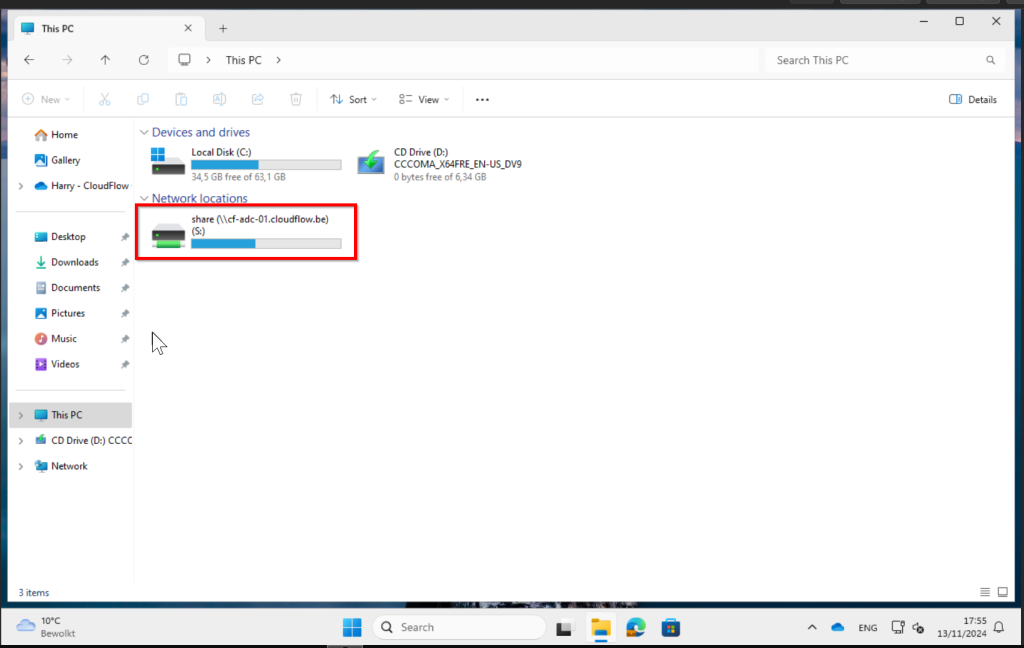
On a target device that is part of the assigned group:
- Sign in and open File Explorer.
- Check that the network drives are mapped as configured.
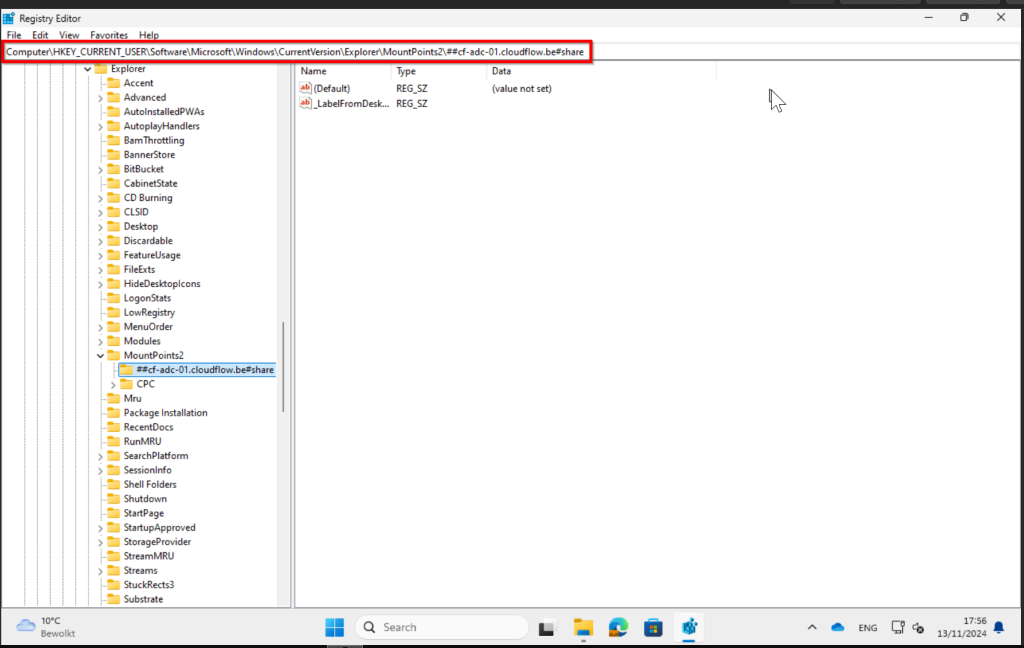
Check Registry In our next steps we will be adding a Registry Key to give it a nice display name
Automate Network Drive Names Using Intune PowerShell Scripting
Now that we’ve got our network drives mapped using Intune policies, it’s time to ensure that each drive displays a user-friendly name. Instead of managing multiple scripts for each network share, we’ll create a single Intune remediation script that sets the _LabelFromReg registry key for all network drives. This not only simplifies management but also enhances the user experience across all devices.
Understanding and Customizing the Script
Before deploying the script, let’s break it down to understand how it works and what you need to customize for your environment.
The Script Explained
Here is the script we’ll be using for the latest version please download it from my github
<#
.SYNOPSIS
    This Intune remediation script automates the process of setting the '_LabelFromReg' registry key
    for multiple servers and drives. It ensures that network drives are labeled consistently across
    all managed devices, enhancing user experience by providing clear and standardized naming for shared resources.

.DESCRIPTION
    The script iterates through a list of servers and drives, updating the '_LabelFromReg' registry key
    for each combination. It checks if the registry path exists and if the current label value differs
    from the desired one before making changes. This prevents unnecessary writes to the registry.

.PARAMETER Server
    The server hosting the network drive.

.PARAMETER DriveName
    The name of the network drive.

.PARAMETER LabelValue
    The label to set for the network drive.

.EXAMPLE
    Set-LabelFromReg -Server "server1.domain.local" -DriveName "driveA" -LabelValue "DRIVE_A"

.NOTES
    Author: Maxime Guillemin
    - This script is intended to be used as an Intune remediation script.
    - Ensure that the script runs under the user context, as it modifies HKCU (Current User) registry keys.
    - Test the script in a controlled environment before deploying it organization-wide.

#>

# Intune Remediation Script: Set _LabelFromReg Registry Key for Multiple Servers and Drives

# Define the list of servers
$servers = @(
    "server1.domain.local",
    "server2.domain.local",
    "server3.file.core.windows.net"
)

# Define the list of drives and their corresponding label values
$drives = @(
    @{ Name = "driveA"; Label = "DRIVE_A" },
    @{ Name = "driveB"; Label = "DRIVE_B" },
    @{ Name = "driveC"; Label = "DRIVE_C" },
    @{ Name = "driveD"; Label = "DRIVE_D" },
    @{ Name = "driveE"; Label = "DRIVE_E" },
    @{ Name = "driveF"; Label = "DRIVE_F" },
    @{ Name = "driveG"; Label = "DRIVE_G" },
    @{ Name = "driveH"; Label = "DRIVE_H" },
    @{ Name = "driveI"; Label = "DRIVE_I" },
    @{ Name = "driveJ"; Label = "DRIVE_J" },
    @{ Name = "driveK"; Label = "DRIVE_K" },
    @{ Name = "driveL"; Label = "DRIVE_L" },
    @{ Name = "driveM"; Label = "DRIVE_M" },
    @{ Name = "driveN"; Label = "DRIVE_N" }
    # Add more drives with their label values as needed
)

# Function to set the registry key
function Set-LabelFromReg {
    param (
        [string]$Server,
        [string]$DriveName,
        [string]$LabelValue
    )

    # Construct the registry path
    $regPath = "HKCU:\Software\Microsoft\Windows\CurrentVersion\Explorer\MountPoints2\##$($Server)#$($DriveName)"

    try {
        # Check if the registry path exists
        if (-not (Test-Path -Path $regPath)) {
            Write-Host "Registry path not found: $regPath"
            return
        }

        # Get the current value of _LabelFromReg
        $currentValue = (Get-ItemProperty -Path $regPath -Name '_LabelFromReg' -ErrorAction SilentlyContinue)._LabelFromReg

        # Set the registry key only if the value is different or doesn't exist
        if ($currentValue -ne $LabelValue) {
            New-ItemProperty -Path $regPath -Name '_LabelFromReg' -Value $LabelValue -PropertyType ExpandString -Force
            Write-Host "Set '_LabelFromReg' to '$LabelValue' for path '$regPath'"
        }
        else {
            Write-Host "'_LabelFromReg' is already set to '$LabelValue' for path '$regPath'"
        }
    }
    catch {
        $errMsg = $_.Exception.Message
        Write-Host "Error setting '_LabelFromReg' for path '$regPath': $errMsg"
        Exit 1
    }
}

try {
    # Loop through each server and drive
    foreach ($server in $servers) {
        foreach ($drive in $drives) {
            Set-LabelFromReg -Server $server -DriveName $drive.Name -LabelValue $drive.Label
        }
    }
    Exit 0
}
catch {
    Exit 1
}
Key Components of the Script:
- Servers List (
$servers): An array containing the server names where your network shares are hosted. - Drives List (
$drives): An array of hashtables, each representing a network drive with itsNameand desiredLabel. - Function
Set-LabelFromReg: Sets the_LabelFromRegregistry key for the specified server and drive. - Execution Loop: Iterates through each server and drive combination to apply the label settings.
Customizing the Script for Your Environment
To make this script work for your organization, you’ll need to update the following sections:
- Update the Servers List (
$servers):Replace the placeholder server names with your actual server names:
# Define the list of servers
$servers = @(
    "yourserver1.domain.local",
    "yourserver2.domain.local",
    "yourserver3.file.core.windows.net"
)
- Update the Drives List (
$drives):
Modify the drive names and labels to match your network shares:
# Define the list of drives and their corresponding label values
$drives = @(
    @{ Name = "finance"; Label = "Finance Department" },
    @{ Name = "hr"; Label = "Human Resources" },
    @{ Name = "projects"; Label = "Projects" }
    # Add more drives with their label values as needed
)
- Review the Registry Path Construction:
Ensure that the registry path in the Set-LabelFromReg function matches how your network drives are mapped:
$regPath = "HKCU:\Software\Microsoft\Windows\CurrentVersion\Explorer\MountPoints2\##$($Server)#$($DriveName)"
Deploying the Remediation Script via Intune
Since this is a remediation script, we’ll deploy it using the Proactive Remediations feature in Intune (part of Microsoft Endpoint Manager). Proactive Remediations allow you to detect and fix common support issues on enrolled devices.
In this case, our script both detects and remediates the issue. Therefore, we’ll use the script as the detection script in Proactive Remediations and leave the remediation script empty.
Access the Microsoft Endpoint Manager Admin Center
- Sign in to the Microsoft Endpoint Manager admin center with your administrator credentials.
Navigate to Proactive Remediations
- In the left-hand navigation pane, select Reports.
- Under Endpoint analytics, click on Proactive remediations. Note: If you don’t see Endpoint analytics, you may need to enable it or ensure you have the appropriate permissions.

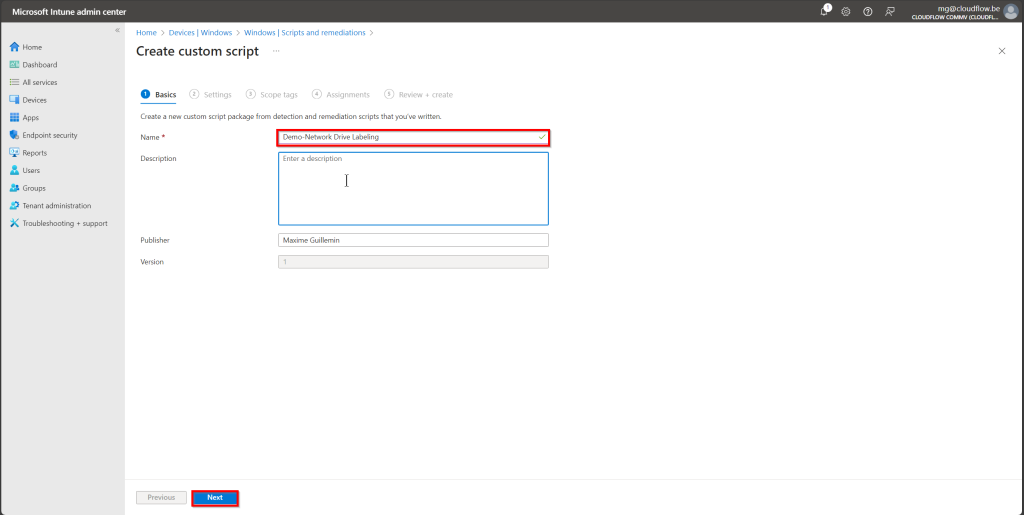
Create a New Script Package
- Click on + Create script package.
- Basics:
- Name: Enter a descriptive name, e.g., “Set Network Drive Display Names”.
- Description: Optionally, provide additional details.
- Click Next.
Upload the Detection Script
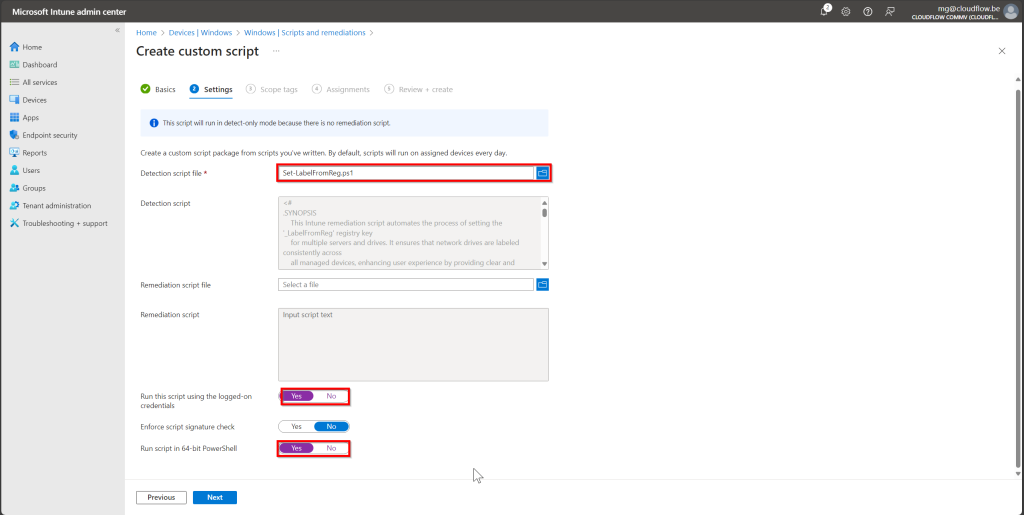
Since our script performs both detection and remediation, we’ll use it as the detection script and leave the remediation script empty.
- Detection Script:
- Script file: Upload your customized script (
Set-DriveLabels.ps1). - Run this script using the logged-on credentials: Yes (since we’re modifying
HKCU). - Run script in 64-bit PowerShell: Yes, unless your environment requires otherwise.
- Script file: Upload your customized script (
- Remediation Script:
- Script file: Leave this blank or upload an empty script.
Scope Tags (Optional)
- If you use scope tags for management, assign them here.
- Click Next.
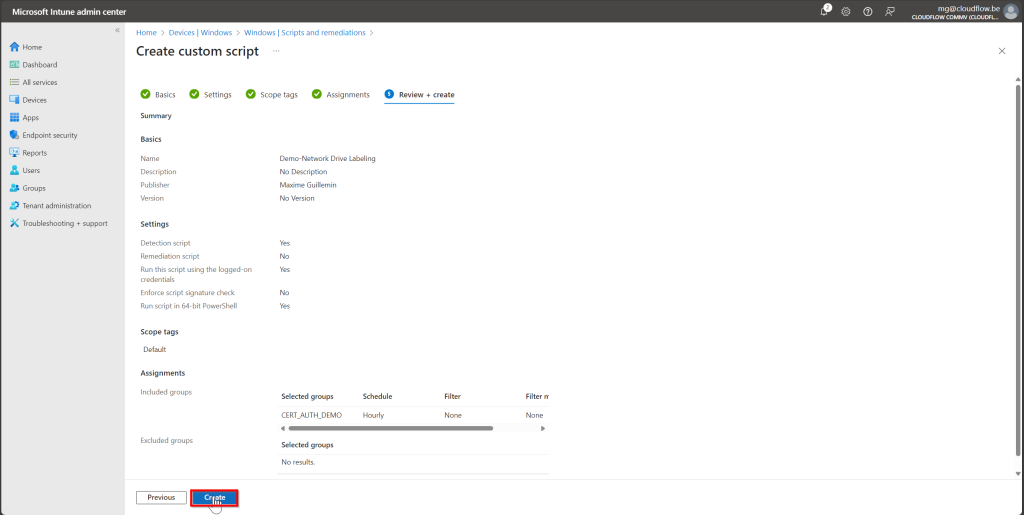
Assignments
- Included Groups: Select the user or device groups that need this remediation script.
- Change Schedule to every hour

- Excluded Groups: Optionally, exclude groups if necessary.
- Click Next.

Review and Create
- Review all settings.
- Click Create to deploy the remediation script.
Verify Remediation Script
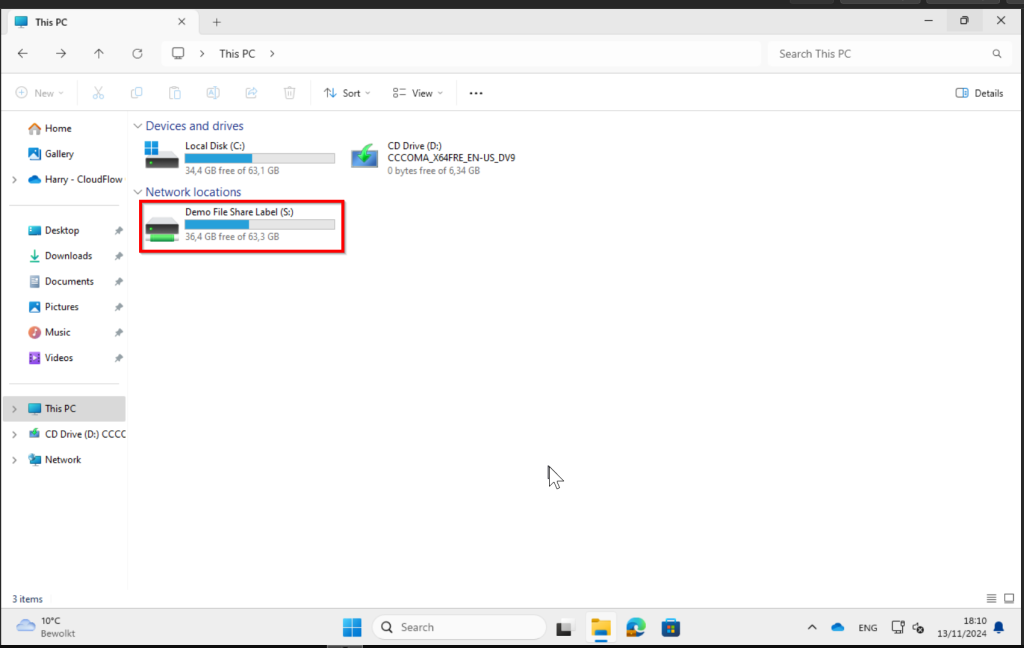
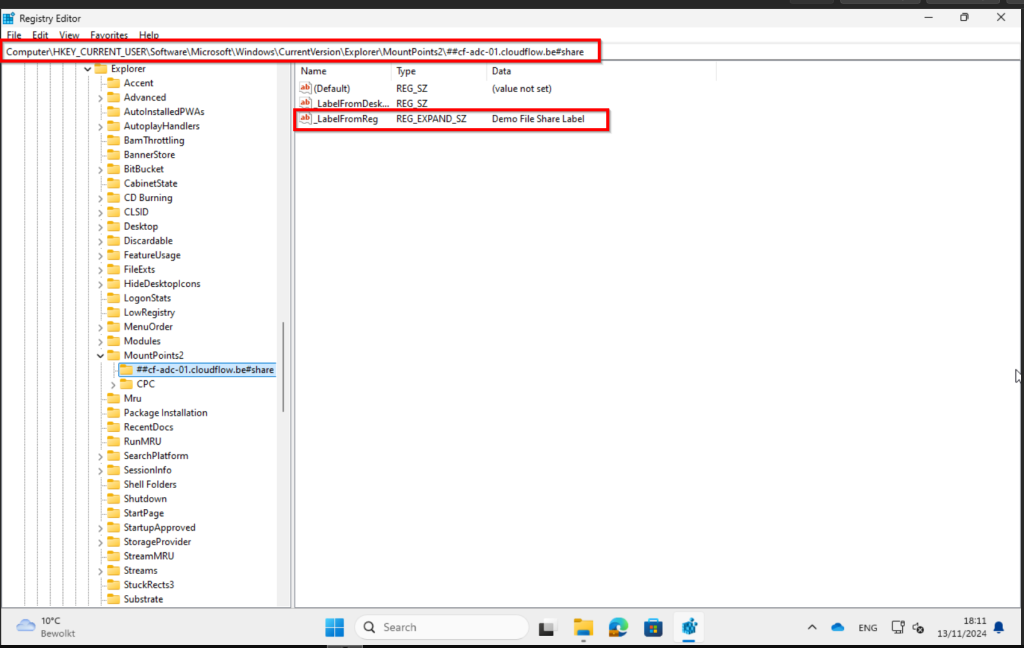
After the remediation has ran on the device you will see in the file explorer that there is now a label to the file share and in the registry there will be an extra key added to the mount point.
Conclusion: Intune Magic for Network Drives
Who would’ve thought that managing over 20 network drives could be this… dare I say it… easy? By combining the power of Microsoft Intune with a dash of PowerShell magic, we’ve turned a potential administrative nightmare into a walk in the park.
No more juggling dozens of scripts or losing sleep over inconsistent drive labels. With our all-in-one remediation script, we’ve streamlined the entire process. Now, you can maintain all your network drive display names with just one script—saving you time, effort, and perhaps a few gray hairs.
Hope you found this help full and if you have any remarks don’t hesitate to contact me.


How does the article propose automating the naming of network drives using Intune, and what are the benefits of this approach?